Saturday 8 April 2017

The Art of Glass

Glass is something that has always fascinated me, I have several pieces which I love, making pieces is a whole different business, the art of blowing glass is mesmerising. 

Today I have had a one to one session with an artist blowing glass, I made a couple of pieces which I will get tomorrow as it has to go into a Lehr Kiln for an Annealing of glass which is a process of slowly cooling hot glass objects after they have been formed.

Here is a few images from today.


This piece is an experimental piece as we added metal leaf to the glass, I have a feeling it may have burnt and gone black but if you don't test these things you would never know. 

You can see I am manipulating the glass pushing into it with a metal rod, this will form air pockets when the next hot glass is collected.

Shaping the glass using newspaper soaked in water, quite worrying that the only thing keeping the molten glass from touching your bare skin is a wad of the daily news. My tutor above is Dave Martin, actually he is a family friend and used to be in Fire Brigade with Chris my husband.

Using tools to shape the glass, all the time taking the glass back and forth to the oven to keep the glass hot enough to manipulate. You can see I ended up wearing a sleeve to protect my arm from the Heat of the glass.

The above is the start of the second piece, you have to keep the pole turning in the oven to stop the glass falling off the pole.

The second piece is a blown piece, you can see me blowing out my cheeks as it takes a bit of pressure to get the air down the pipe and start the process.

You can see Dave forming the shape while I blow down the pipe to form the cavity inside of the glass.

I will post an update with both pieces finished as soon as they have cooled.

This has been an amazing experience for me, anyone thinking of booking a one to one session at the National Glass Center in Sunderland I can highly recommend it.
Tuesday 4 April 2017

Jamberry Nails

As some of you know already I have become a Jamberry Nail consultant. I always wanted pretty nails but having psoriasis meant I had to be very mindful of what I put on my nails as any damage to my nailbed would mean that psoriasis would take over. 
I did loads of research into the company and prayed that it would become available to the UK my prayers were answered and i snapped up the opportunity to become part of it.
Okay I hear you say, what is so special about this company? 
Well they care, they care about the products we use and all of their products are 8 Free.
Not only are all our products cruelty-free, 100% vegan, non-toxic, they are also free of Formaldehyde, Toluene, DBP, Formaldehyde Resin, Camphor, Ethyl Tosylamide, TPHP, and Zylene (that’s where we get the 8 Free). This is all in our efforts to make life beautiful and bring you a world of innovative nail products that are effective and safe.
With the added ability of over 300 nail wrap designs and getting 2 full manicures and 2 full pedicures from each nail wrap design it mad it a cost effective way to have pretty nails that lasted up to 2 weeks on fingers and up to 6 weeks on toes.
All nail biters out there will will fall in love with these wraps as they also protect your nails as they grow and you are less likely to chew them down.
I also offer a buy 3 and get 1 free on all of the nail wraps so your manicure that will last you up to 2 weeks will cost even less.
Of course there are many other products to be had and you can browse them all hear www.jakheath.jamberry.com


Sunday 26 February 2017

My Memory Keepers Stamping System

So my Stamping has never been a problem for me, yet I was intrigued by the MMK CMYK Stamping system thinking of accuracy and learning my grandson how to use stamps.

So we played with it and he loved it but more than that, so did I.


I had promised to make a picture for my friend Nigel May who incidentally is not just a presenter but also an accomplished author of some very juicy novels.

I knew the typewriter stamp would be perfect for him. I made several of the stamped images and made a 3D decoupage picture, I created the background and yes it also has a typo. Added a bit of sparkle and some black ribbon to look like the inked typewriter ribbon.

Well worth the investment, loved it.

Friday 14 October 2016

Coral Christmas Beading

I'm finding more and more that I want to sit on an evening and enjoy a bit of beading. I love that I can sit with a bead Matt on my knee without the worry of my beads rolling off a tray and sit with Chris watching a bit of TV.

What crafting is your TV Craft?

Anyway, this was mine for the last couple of evenings.

Crystal Cascade kit, purchased from Bead Supply Auctions by Boheme.

Quite funny really as I wasn't keen on the colour ways of this until I started to make up the snowflake elements.

Pretty yes? I think so.

So now I need to find a new project to start.

I was aware that my link for my Jamberry Nail Wraps failed, I did correct it but here it is again Jamberry nail shop. And while I am featuring Christmas her are some gorgeous Christmas designed nail wraps.


Monday 26 September 2016

Photos on Wood

I was playing around with an idea of putting photos onto wood.

I wasn't sure that it would work for me but I knew I wanted to try it. The first couple of tries were a disaster and the image peeled away. I first tried with good old PVA although it seemed to have worked the glue just went milky and when peeling off the backing of the photo, I lost too much of the image to save.

I next tried with decopatch, this worked a little better but again I was losing too much of the image.

My final try was with a product made by Trichem called Voila, I've had this product for 10+ years and it worked beautifully.

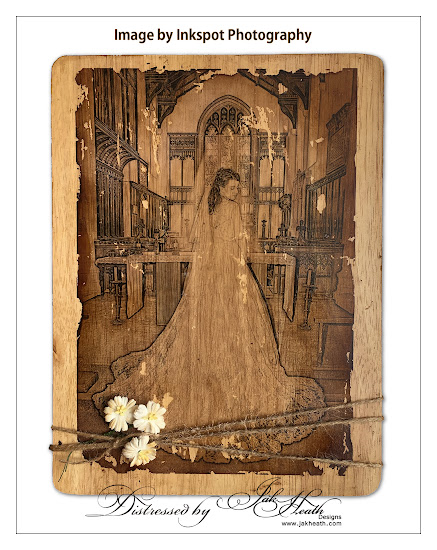
I had to prepare the photo and created a sketch from the photo before printing onto a Matt photograph paper. Once I had brushed the Voila over the chopping board I layed on the image and let it completely dry into the Voila. That's when the fun starts, you have to soak the back of the photo and gently roll away the backing and this leaves the image in place on the wood.

I then let it dry and started to use distress inks around the edges and wrapped string and added flower and then give it a spray with a Matt varnish.

Of course once the above photo of my Daughter on her wedding day was done I needed to go on to my favourite subject of my Grandson with his Grandad.